The Ultimate New World Healer Guide and Builds
BagginsTV's ultimate healing guide and builds for New World.

Hey guys, it's Baggins here! Welcome to my first written guide, a comprehensive and in-depth walkthrough for all things healing-related in New World for 2022. I'll cover everything from builds, tips, abilities and more, so you can head into Aeternum ready to heal like a pro.
This guide is relevant to both new, returning, and even the more experienced players, as I'll be covering not only the basics, but also the current meta, including popular perks, secondary weapons, and advanced tactics.
If video guides are more up your street, then all the information can also be found in my YouTube video right below.
If you're more of a reader, however, or are looking for all the handy links and item info pages all in one place, then read on!
Understanding the Healer Role
There is currently only one healing weapon in the game as of 2022, and that is the life staff. While there are elements of small-scale heal and shielding in other weapons, such as a focus-scaled void gauntlet, the only dedicated weapon for healing at the moment is the life staff, so it will be the main focus of this guide.
The role of a healer is to keep their team alive, but it's not as easy as it sounds. Usually the first to be focused by the enemy, healers must keep not only their team alive, but also themselves, which requires coordination, cooldown management, constant movement, good placement on the battlefield, and quick wits.
Weapon Pairings
There is a number of viable secondary weapons, all bringing different utility to your build, but there are two that stand out as stellar options for those looking to maximize their healing output; the void gauntlet, and the rapier.
Void Gauntlet
The void gauntlet is a popular choice, due to it's healing and debuffing abilities. Void gauntlet offers decent self and target healing via the orb of decay, while at the same time damaging opponents, as well as applying some strong debuffs and CC, such as weaken and root, with [ability_ability_voidgauntlet_scream] and [ability_ability_voidgauntlet_nullchamber].
Rapier
Another tried and tested choice is the rapier. It is especially popular in PvP builds, due to the rapier's ability to help you stay out of danger. It offers an arsenal of dashes, stuns, and dodges, which are immensely beneficial to healers due to the get out and get away factor they bring. From [ability_ability_rapier_riposte]'s stun and damage deflect, to [ability_ability_rapier_evasion]'s invulnerability, the rapier is a solid sidekick when it comes to movement and survivability.
Stats and Attributes
In terms of attributes, you are aiming for 500 total points minimum. To achieve this, you must be level 60, have all your gear (weapons and jewelry included) at 600 gear score, and have eaten tier V attribute food. The tier V food you consume will directly boost a specific attribute by 40 points, so make sure you eat the right one, with your two best options as a healer being the [item_foodcont5] or the [item_foodconfoct5].
When it comes to stats and spending your attribute points, the key is is not to over-spec, or spread your points too thin over too many attributes. The most common spec, and one that is highly recommendable for all scenarios, is 300 points into focus, and 200 into constitution.
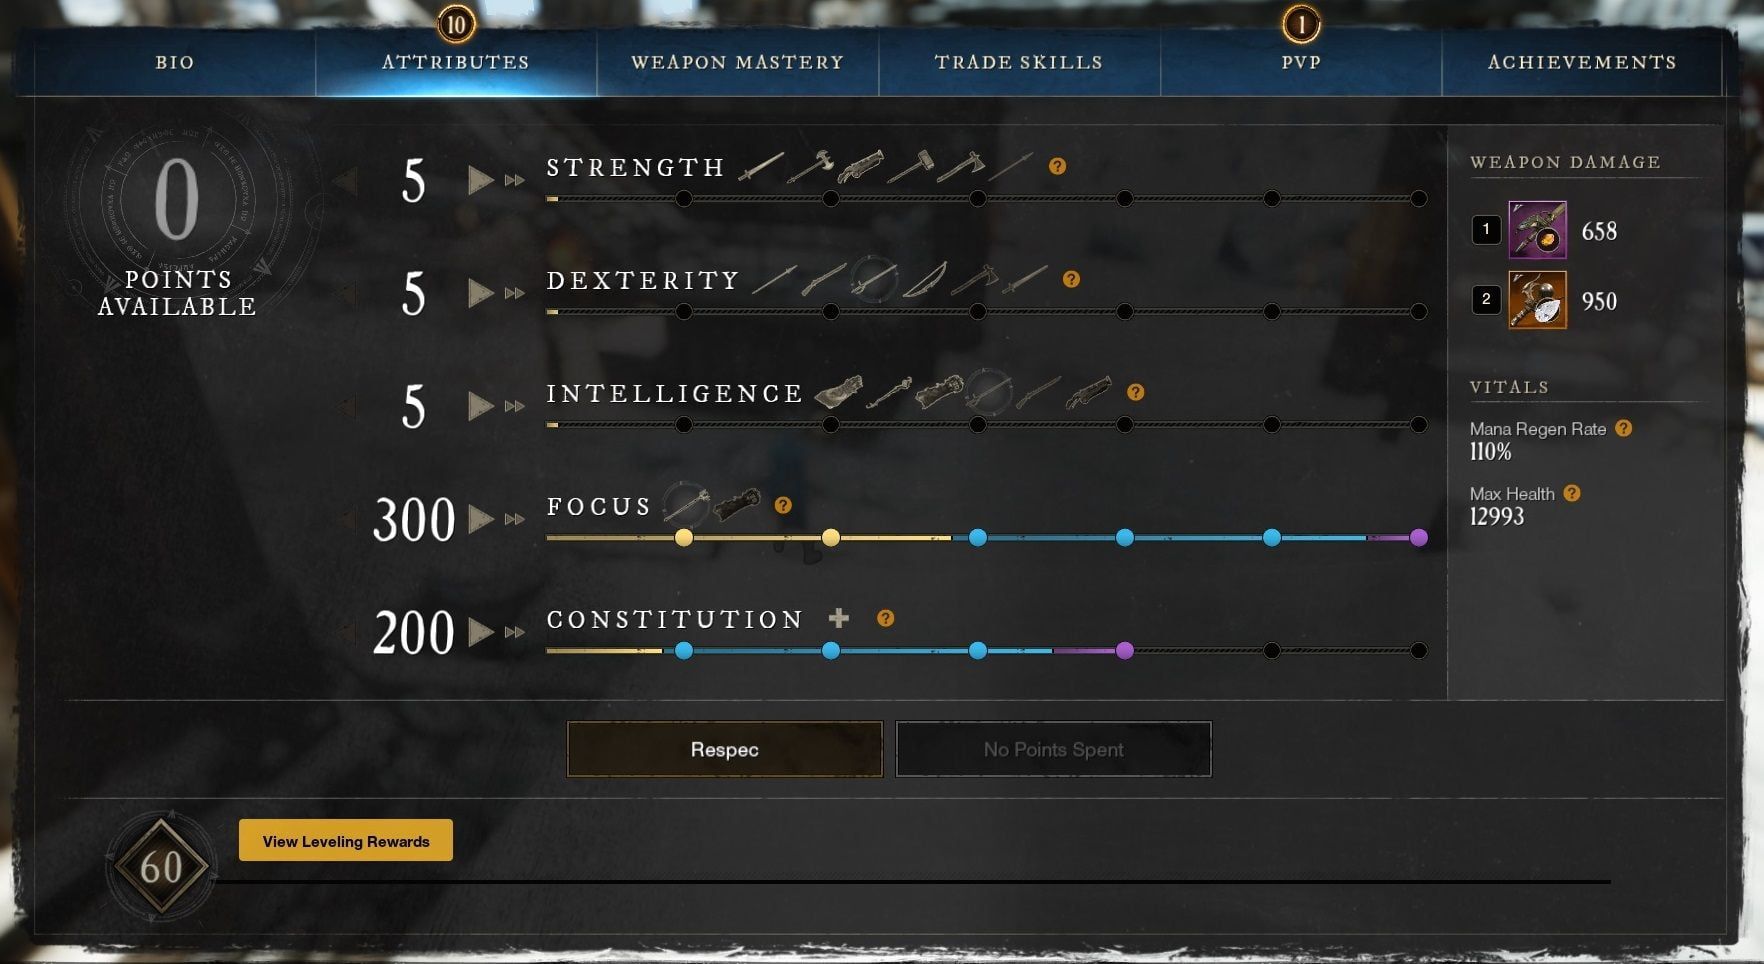
Focus
At 300 points in focus, your healing is at optimum, having unlocked all of the point perks along the bar (including a 20% increase in healing output and a 30 mana top up on successful kills) with no risk of diminishing returns, which is something that becomes apparent the more you spec into focus. Putting excess points into focus will start to provide less of an increase in your healing output, as well as taking away valuable points from other attributes.
Constitution
At 200 points, your constitution offers a nice amount of security. It's a good level to prevent one shots, and provides enough health to endure a fair few pokes and stuns should you need to reposition and heal up, without detracting from your healing output by eating into your focus.
That said, some healers do opt for a 350 focus with 150 constitution build, but while this can boost your heals that little bit more, it does make you much more reliant on your teammates - especially your tank - and can also offer more risk than reward. The healing output difference between 300 and 350 focus is nominal, but losing those extra 50 points in constitution has the potential to really hurt, and can be very apparent when up against high damage dealers, such as full dexterity musket builds, as it greatly increases your chances of getting one shot.
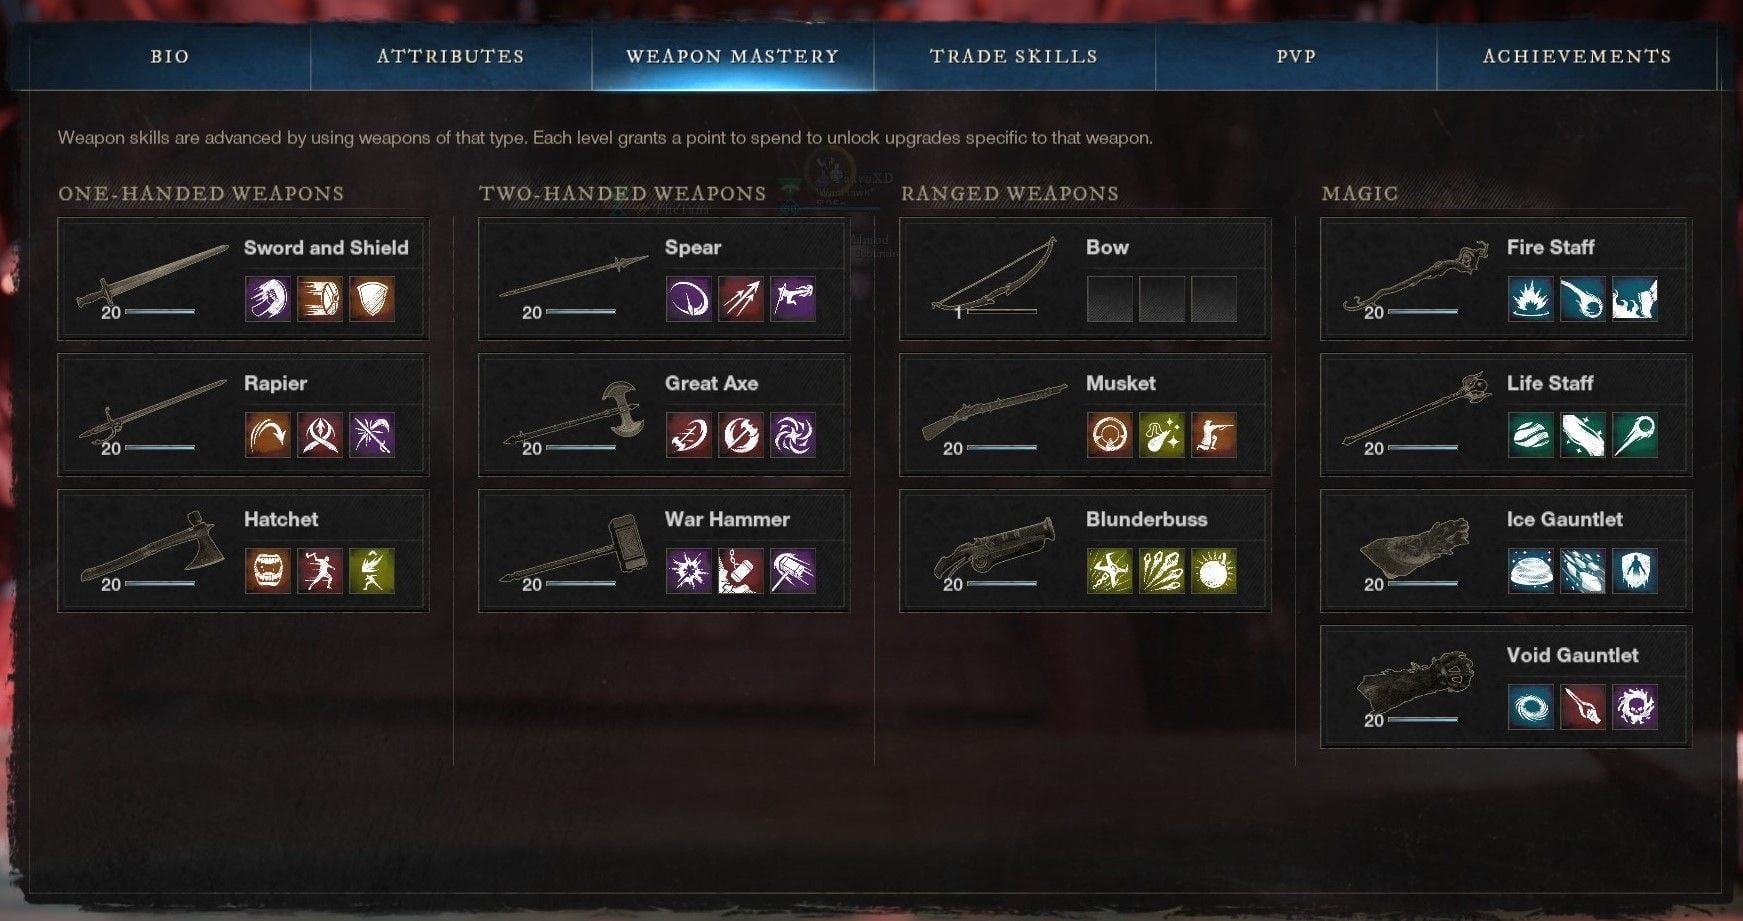
Weapon Mastery
While some abilities and passives are pretty universal, and used in almost all situations, as a healer you will find yourself regularly rebuilding your skill trees to suit different scenarios. PvE and PvP builds differ greatly, and even different PvP modes require different builds. What works in expeditions doesn't always work well in 3v3 arenas, and what works well in the 3v3 arenas won't always apply to wars and Outpost Rush, and so on.
We'll start off with your primary weapon; the life staff.
Life Staff
Your first ability to pick up is a pretty permanent choice, as it will be useful in almost all scenarios, and that is [ability_ability_lifestaff_scaredground]. You should also make sure to pick all the passives for Sacred Ground, too, which will maximize the ability's capabilities. The final passive for Sacred Ground, [ability_upgrade_lifestaff_scaredground_dmgonend], is especially important, as it boosts all incoming healing for both you and your allies by a huge 50% when standing in Sacred Ground. This includes potions and other abilities.
The staple passives that are always recommended to take are [ability_passive_lifestaff_protection_healingondodge] and [ability_passive_lifestaff_protection_healingperbuff], as both of these buff your outgoing healing, [ability_passive_lifestaff_healing_healonlight] to enable your light attacks to heal allies, as well as [ability_passive_lifestaff_healing_cdronlow] and [ability_passive_lifestaff_healing_cdronlight] to reduce your cooldowns.
As a general rule of thumb, these talents form the basis for your life staff build.

Unfortunately, when it comes to the second ability to pick up, a recent nerf to [ability_ability_lifestaff_lightsembrace] has seen a shift in the meta. While Light's Embrace used to unquestionably be the go-to single target heal, we're now seeing a mix of both Light's Embrace and [ability_ability_lifestaff_divineembrace] in healing builds. After doing the math and testing out the cast times and things on both the PTR and live servers, however, Divine Embrace now offers better healing overall.
So, the second ability to pick up is Divine Embrace, but it does require you to run a specific perk on a piece of armor in order to maximize it's potential. Once again, make sure to max out all the passives for this ability, too.
For the third and final ability, you have a choice between [ability_ability_lifestaff_orbofprotection] and [ability_ability_lifestaff_beacon], and the choice comes down to what perks you have on your gear. If you are able to run the [perk_perkid_ability_lifestaff_orbofprotection] perk, then Orb of Protection is a very valuable heal. If you don't have that perk, then Beacon becomes just as viable an option. For Orb of Protection, you should again max out all three passives. For Beacon, however, you only need to pick the first two passives, as [ability_upgrade_lifestaff_protection_addhaste] is very rarely useful for you or your team. This also opens up an extra point for you to spend on an important passive; [ability_passive_lifestaff_healing_healingbuffonbasic]. Intensify gives you a 30% increase in outgoing healing after hitting 3 heavy attacks, which is a huge boon in ongoing combat, such as wars or expeditions.
Finally, you can now select your ultimate passive, [ability_ultimate_lifestaff_healing].
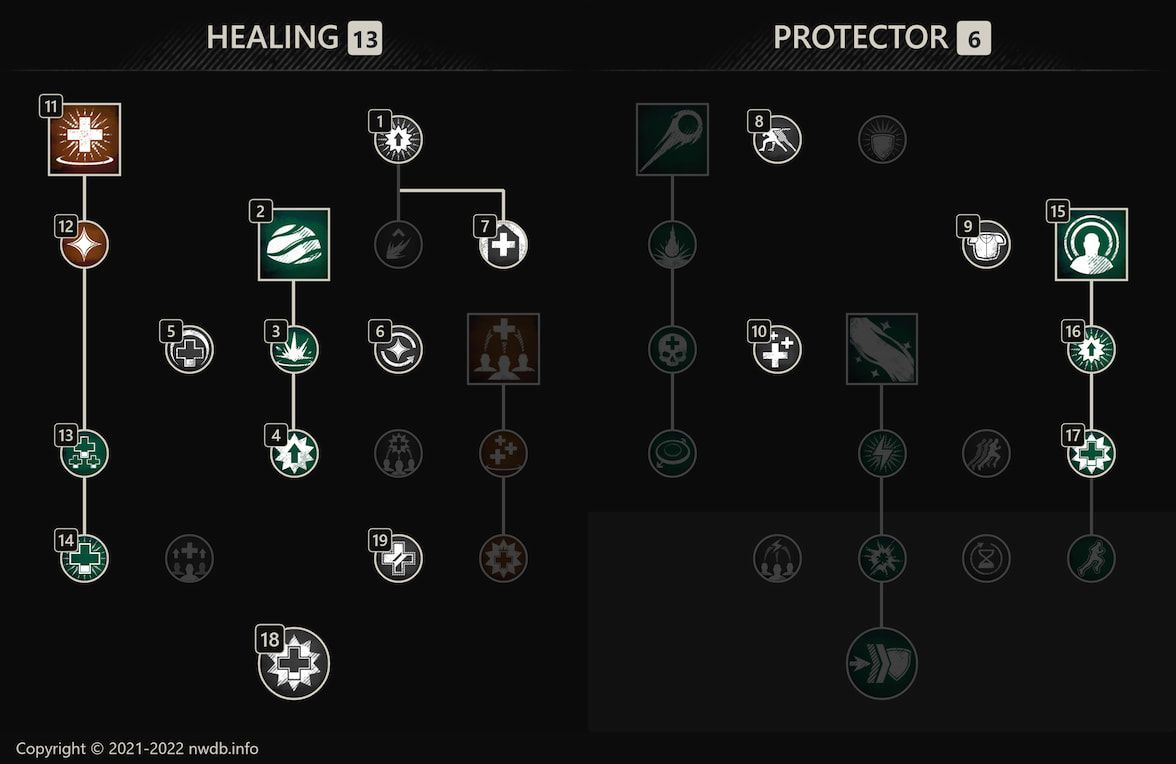
That said, there is definitely room to play around with your choices to see what suits your playstyle best, such as swapping out [ability_passive_lifestaff_protection_fortifyonbasic] for [ability_passive_lifestaff_healing_grouphealing], for example. A couple of talents to absolutely avoid include [ability_passive_lifestaff_protection_manaonblock] (as a healer, you do not want to be blocking, but instead dodging and trying to move away from incoming attacks) and [ability_passive_lifestaff_protection_hastewhenlow] (you should be avoiding getting below 50% health as a healer, anyway) as well as [ability_passive_lifestaff_protection_groupmana] (a 3% increase to the speed of your mana regeneration is not even noticeable).
Void Gauntlet
Now, for the void gauntlet, the first ability you should always take is [ability_ability_voidgauntlet_decayingorb], as it provides as significant amount of healing when all passives are maxed out, making it a comparable heal to the life staff's Beacon, even arguably stronger.
The essential passives to take here, alongside the three Orb of Decay passives, are [ability_passive_voidgauntlet_cdrwhileharvest] to reduce cooldowns, [ability_passive_voidgauntlet_reducedmanacosthighmana] to reduce mana cost, and [ability_passive_voidgauntlet_healondodgemaxmana] for a substantial self-heal when dodging with full mana.
In terms of other abilities, for PvE the best choices are [ability_ability_voidgauntlet_essencerupture], for the extra heals and stamina boost, and [ability_ability_voidgauntlet_nullchamber] for the stamina boost again, as well as the empower buff on allies and the weaken debuff on enemies.
For the other passives, you are generally looking for those that lower your cooldowns or captilalize off them, such as [ability_passive_voidgauntlet_cdrvsdebuff], [ability_passive_voidgauntlet_cdroncrit], and [ability_passive_voidgauntlet_bonuscritchanceoncooldown]. To round it off, take [ability_passive_voidgauntlet_empowercloserange] for the nice empowered buff.
With the remaining point, you can take the [ability_ultimate_voidgauntlet_cdronstackconsume] ultimate passive, but it can be tricky to pull off when in the thick of combat, so you can also instead just take the normal passive [ability_passive_voidgauntlet_harvestreducedcostlowmana] to work alongside your Refreshing Harvest, which will prevent it eating into your health too greedily.
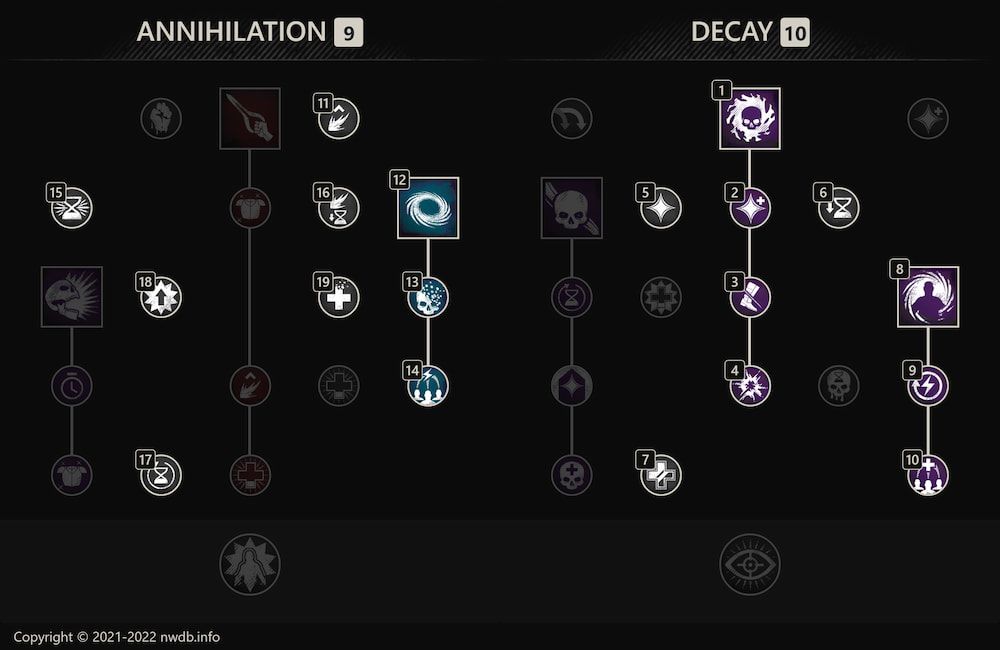
For PvP, your build is going to be pretty similar, but instead of Essence Rupture you're looking to pick and max out the [ability_ability_voidgauntlet_scream] ability. With this fully unlocked, instead of Efficient Harvest or Glimpse of the Void, you should then be picking the other ultimate ability, [ability_ultimate_voidgauntlet_dothealaura]. While it can be a little tricky to trigger this one due to needing six stacks, when you do then trigger this ability, it is a substantial heal on a short cooldown, making it a worthwhile pick.
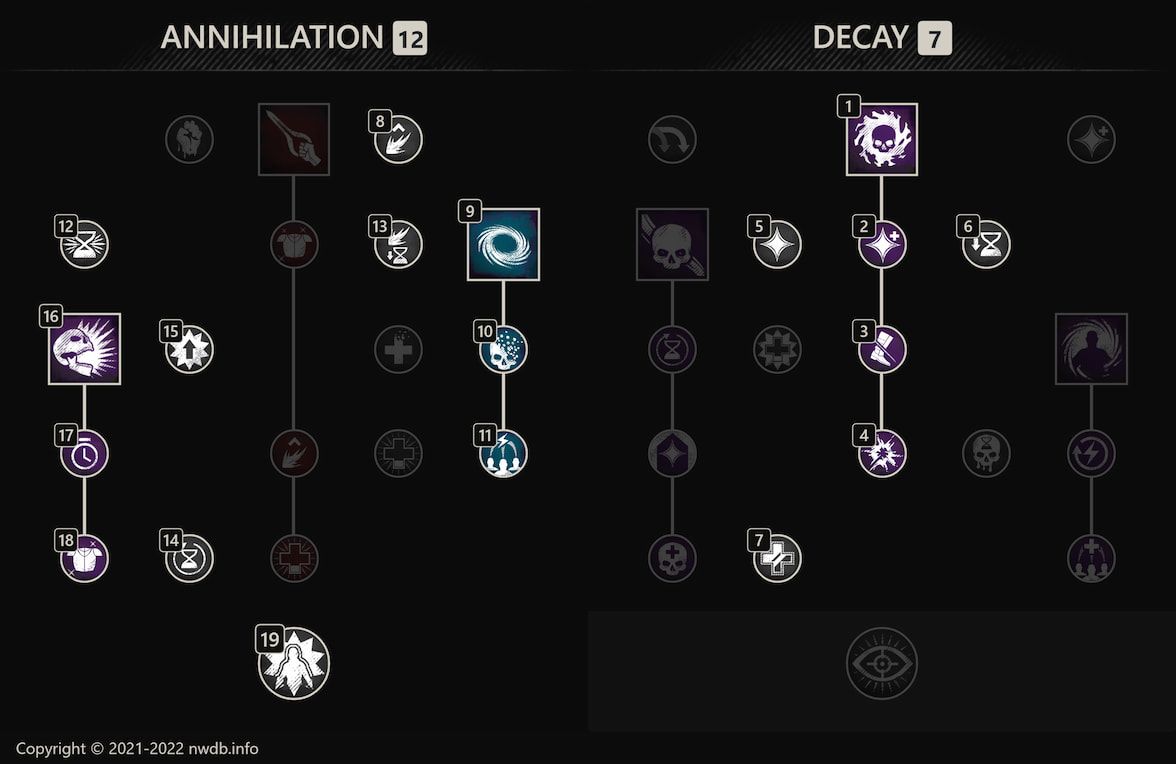
However, for those of you looking to get more involved in the action, you can take the [ability_ability_voidgauntlet_voidblade] ability instead of Petrifying Scream. Void Blade transforms your void gauntlet into a melee weapon, which not only gives you more damage, but is also a very reliable way to get those six stacks, enabling you to trigger the Voidcaller ultimate much more often.
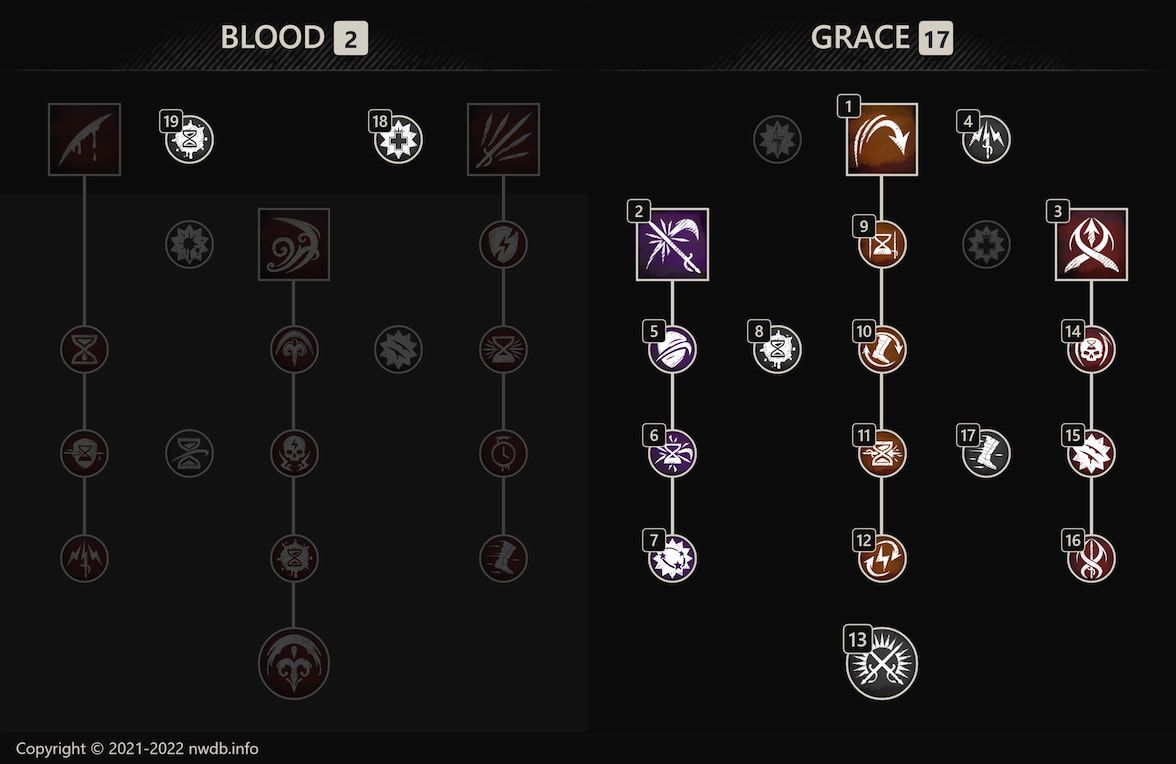
Rapier
Lastly, in terms of respeccing your skill tree to suit each scenario, Rapier is a much simpler weapon option, as there is only one build worth taking.
For rapier, you want to pick and max out all three Grace tree abilities, [ability_ability_rapier_evasion], [ability_ability_rapier_riposte], and [ability_ability_rapier_aerial_lunge_intro], as these are the ideal defensive tools to keep you moving and keep you safe. As a healer, rapier is used for it's escape utility, as it enables you to keep your distance from your enemies.
When it comes to passives, you're looking for the talents that give you cooldown reduction, stamina, or movement speed, so your best choices to take are [ability_rapier_bonuscdoncrit], [ability_rapier_bonusspeedonkill], [ability_rapier_bonusstamregenonkill], [ability_passiverapier05], and [ability_passiverapier02].
Finally, you want to take the [ability_rapier_bonusdmgafterability] ultimate ability.
Light, Medium or Heavy?
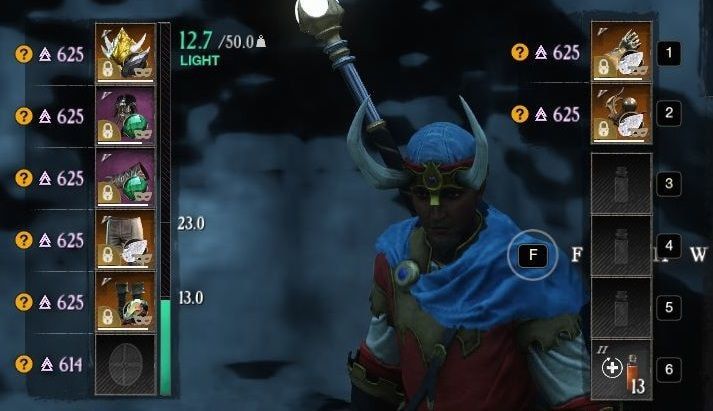
For equipment load and armor weight, you want to be in the light or medium weight class. Light armor is going to be your go-to if you want maximum healing output, and it also gives you access to the light dodge roll, a very nice movement tool, and pairs well with the rapier. If you're looking for that little bit more defense, then medium is going to be your go-to, and is the best weight to be in if you're planning to use the void gauntlet, as without the rapier you lose a vast majority of your escape power.
One important thing to note is that when it comes to your armor and equipment, you are looking to achieve your weight class using a variety of gear, and does not mean you should be only looking for light armor to achieve light load, medium armor to achieve medium load, and so on.
When it comes to a medium load, you actually want to be running two pieces of heavy armor, to take advantage of the physical and elemental damage reduction they give. You are looking to stay just under the heavy load class, and the recommended armor set up you should be running is heavy helmet, heavy chest piece, medium gloves, light legs, and medium boots. This is going to give you the maximum damage resistance achievable while still maintaining a medium equipment load.
For the ideal light load, you want to be running a light helmet, light gloves, light legs and light boots, with your only medium armor being your chest piece. This keeps you just under the medium threshold, making sure to give you access to the light dodge roll but still offering a little bit of protection thanks to your chest piece.
Armor and Weapon Perks
Perks are like passives for your gear that buff your abilities. For general healing perks such as [perk_perkid_ability_lifestaff_sacredground] and [perk_perkid_ability_lifestaff_orbofprotection], it's important to have them on your armor, as there are weapon-exclusive perks that you really want to be looking to have on your weapons. Perks are locked to your gear, and cannot be swapped out like you can with abilities and stats. In order to get the right perks, you have to either craft gear, farm for specific drops in the open world or expeditions, or buy gear off the trading post.
Life Staff
The perks you want to be using on your life staff are [perk_perkid_weaponlife_healoutgoing] and [perk_perkid_weapon_cdrbasic]. Blessed is paticularly important as it boosts all of your life staff's outgoing healing by a huge 20%.
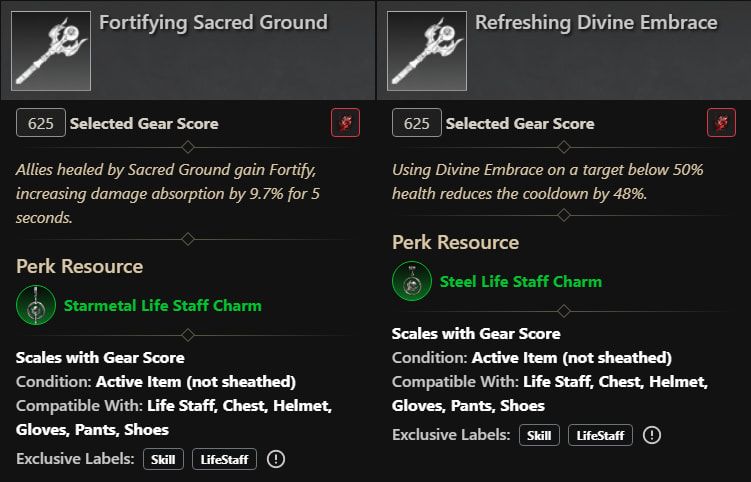
When it comes to your armor, the first perk you want to be picking up is [perk_perkid_ability_lifestaff_sacredground], and this is one that you should always have somewhere in your armor set. This perk grants Fortify to yourself and all allies that are healed by Sacred Ground, a buff that reduces incoming damage by almost 10%, making it comparable to a second Orb of Protection on top of Sacred Ground's own healing capability.
As mentioned before, with the recent nerf to Light's Embrace, you're going to using Divine Embrace a lot more frequently now, so the next perk you're going to be looking for is [perk_perkid_ability_lifestaff_divineembrance]. This essentially cuts your cooldown in half when Divine Embrace is used to heal yourself or an ally below 50%.
The third perk on your armor is dependant on the abilities you are choosing to run on your life staff. If you have opted to use Orb of Protection, then it is hugely recommended to make use of the [perk_perkid_ability_lifestaff_orbofprotection] perk. Mending Protection boosts all your outgoing healing by a huge 24% when you use Orb of Protection to heal an ally below 50% health, making it a great ability to pop when you then follow it up with another healing ability.
If you've chosen to run Beacon instead, then [perk_perkid_ability_lifestaff_beacon] is a good choice, especially if you're running a medium void gauntlet build. This is because you're very likely to be using your health as a resource, so while Revitalizing Beacon only increases your self heals, it's important to keep your health topped up when running this particular build.
Void Gauntlet
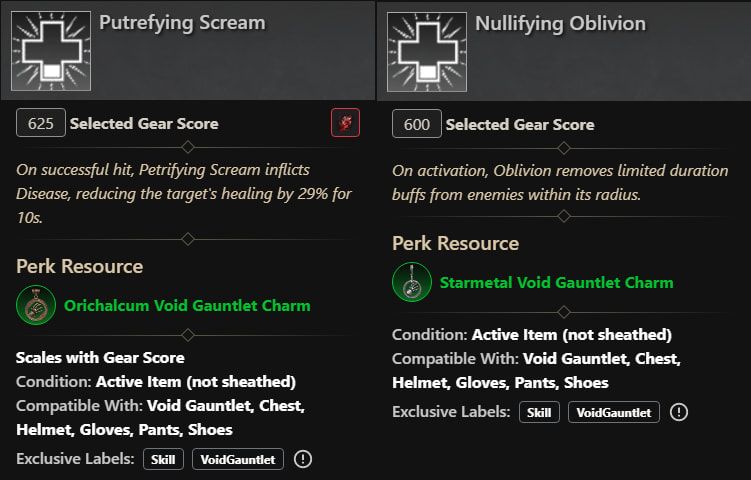
If you're running void gauntlet alongside your life staff, then it will be very important to find yourself an armor piece with the [perk_perkid_ability_voidgauntlet_nullchamber_nullify] perk. This perk enables Oblivion to remove all buffs from all enemies caught within it, alongside Oblivion's usual 30% enemy damage and it's buffs to yourself and your allies.
If you're going to be running Petrifying Scream, then the fifth and final armor perk for your life staff and void gauntlet build will be [perk_perkid_ability_voidgauntlet_scream_disease]. Putrefying Scream is especially useful in PvP, as it enables Putrefying Scream to put the Disease debuff on all enemies it hits, reducing their incoming healing by a huge 30% for ten whole seconds.
Rapier
If, however, you are running rapier alongside your life staff, then your fourth and fifth armor perks will be different.
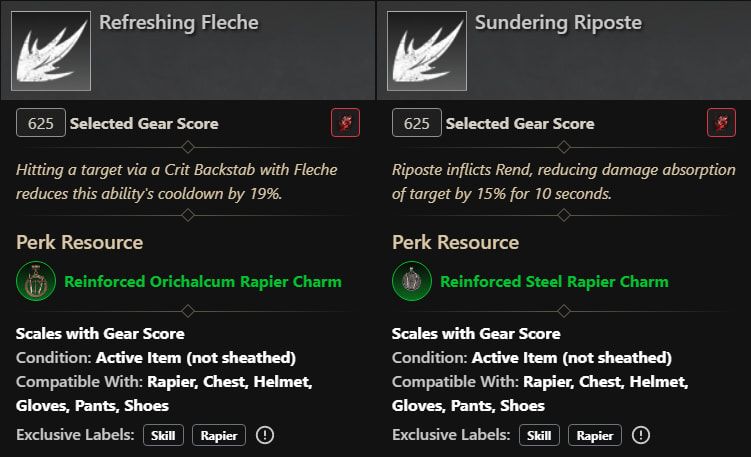
When it comes to your life staff and rapier build, you can opt to have one of either rapier perks on the rapier weapon itself. The two best rapier perks you should run are [perk_perkid_ability_rapier_riposte] and [perk_perkid_ability_rapier_fleche], and both of these are available on both the weapon and your armor. These perks, while not super vital to your role as a healer, do give you a defensive edge by reducing cooldowns and increasing the damage done by yourself and your allies to enemies.
Other Essential Armor Perks
Provided your armor is epic or legendary (which really it should be) then you are going to have more than one perk per piece at your disposal. There are a few non-ability specific perks that are hugely important to have on your gear, that will greatly improve your healing capabilities. Often, these perks also stack, meaning that it's a good idea to have them on most, if not all, of your armor pieces.
The first secondary perk you should be incorporating into your build is [perk_perkid_common_cdr]. This reduces every one of your cooldowns by 3% for every item you have it on, giving you an incredible, and permanent, 15% cooldown reduction if you have it on all five of your armor pieces.
Another perk that works well with all forms of healing that you should be looking to have on your gear is [perk_perkid_armor_rangedefense_elemental]. [perk_perkid_armor_rangedefense_physical] is also a good sister version to consider as well. Both of these reduce incoming damage from ranged attacks, one from elemental ranged attacks, such as the ice gauntlet, and one from physical, such as bows and muskets, both of which can be quite the bane to healers. Again, these can be stacked, and it is a good idea to make use of both versions.
If you're in light armor, then another perk that is an absolute must-have on those armor pieces is [perk_perkid_legs_dodgesuccess_stamina]. It restores a chunk of your stamina every time you dodge, almost enough to dodge a second time. Timed right and coupled with the rapier, this perk enables you to move about nearly constantly, making you an ever moving and very difficult target. Shirking Energy also does not stack, so you only need one piece of gear with it on.
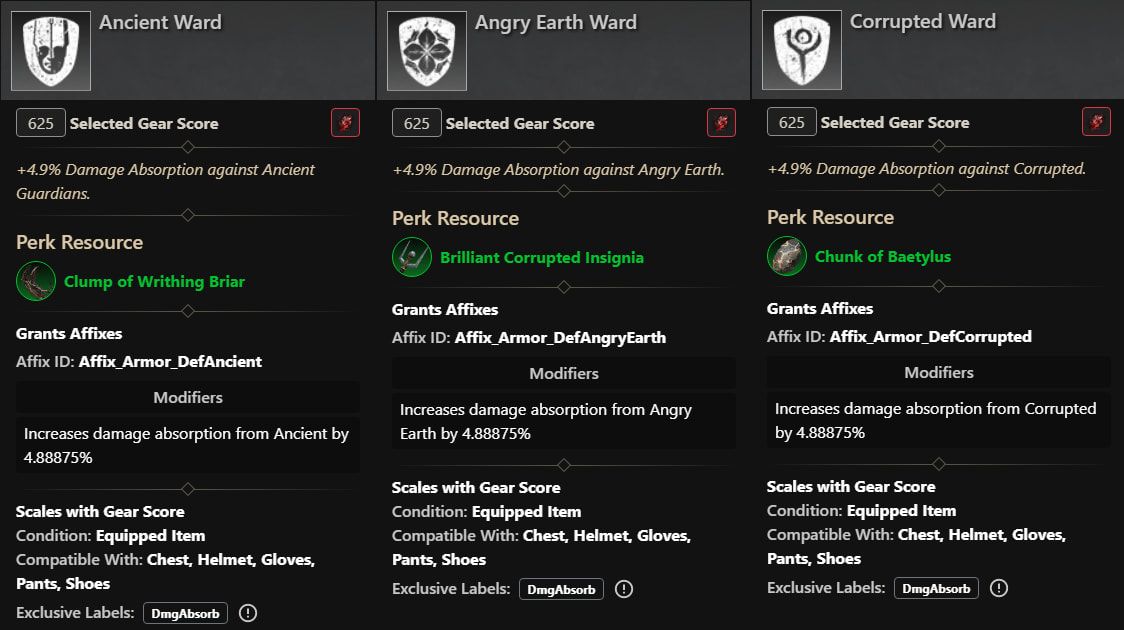
If you are interested in PvE, specifically mutated expeditions, then you should be looking to get at least 3 pieces of ward gear for every damage type. Ward gear increases your resistence to certain damage types. That means 3 pieces of [perk_perkid_armor_defcorrupted] for Corrupted expeditions such as Tempest Heart and Dynasty Shipyard, at least 3 pieces of [perk_perkid_armor_defangryearth] for Garden of Genesis, and [perk_perkid_armor_defancient] for Lazarus Instrumentality.
For PvP, you absolutely need to be running 5 pieces of gear with the [perk_perkid_armor_defcritdmg] perk. While it doesn't apply for PvE, when it comes to fighting other players, it is the most important perk you should be stacking. It reduces the damage you take from critical hits, making it the essential anti-one shot perk.
Another perk that is recommeded for PvP gear is [perk_perkid_armor_durcc], a perk that reduces how long you can be affected by stuns and slows etc. Alongside this, [perk_perkid_armor_dodgesuccess_fortify] is a perk you should definitely be trying to stack, as well - especially if you're in medium armor, as it grants Fortify for every enemy attack you successfully dodge.
Jewellery
Your amulet, ring and earrings all have some exclusive perks that are not available on any other gear items, so for your jewellery you want to not only be looking to have perks such as Refreshing on each piece, but also some jewellery-exclusive perks as well.
As a healer, you absolutely want to be grabbing yourself an amulet with [perk_perkid_amulet_hp], a perk that increases your maximum health by almost 10%. If you're able to get ahold of a legendary amulet, then some good third perks to have alongside your Health and Refreshing include [perk_perkid_amulet_removeonlow], [perk_perkid_amulet_stamonlow], [perk_perkid_amulet_defthurst] (a perk that reduces damage from bows, spears, muskets, etc), [perk_perkid_amulet_defslash] (the same again but for swords, great axes, etc), [perk_perkid_amulet_durfortify], or [perk_perkid_amulet_healing].
For your ring, you always want to have [perk_perkid_ring_healing] as it permanently increases all your outgoing healing by over 8%. If you're in light armour, then the second perk you should be looking to have is [perk_perkid_ring_maxstamina], as it increases your stamina pool by 10%, which is actually enough to enable a third dodge roll. Hearty is also a very viable option in medium armour, but is essential for light.
Finally, on the earring you have a ideal few perks, although it is an expensive ordeal to get hold of a ring with three perfect perks, so you're mainly looking to have a ring with [perk_perkid_earring_healthonpotion]. This perk gives you back a percentage of your health every time you drink a mana potion, something that you will be doing a lot of as a healer. The second best perks to run on your earring, and ideally you would have an earring with these two as well as Healthy Toast, are [perk_perkid_earring_potioncdr] and Refreshing.
Best in Slot Drops
Now, when it comes to actually gearing yourself up, luckily some of the most ideal pieces for a healer are actually drops. This means that you can get at least some BiS gear without having to craft endlessly or spend hundreds of thousands of gold on the trading post. That said, there are still instances where crafted gear will outshine certain loot available in the game.
Weapons
The first item you want to be kitting yourself out with is your life staff, and fortunately, the best life staff right now is indeed a drop. So you're going to be heading into the late game expedition, Lazarus Instrumentality, to farm for [item_2hstafflife_willoftheancientst5], which is undeniably the best life staff in the game.
For your secondary weapons, there surprisingly isn't all that much choice. The [item_1hgauntletvoid_darkvengeancet5] void gauntlet is the only focus + Blessed void gauntlet in the game that can be dropped, and it's second and third perks are generally unutilised by healers. Pair that with the fact that it is a random drop with no guaranteed place to get it (it can drop from any chest or level 60+ enemy in the open world), and you are most likely better off crafting a focus + Blessed void gauntlet yourself using a [item_shard_voidgauntlet] if you have already levelled up your Arcana trade skill.
For the rapier, again your time and gold would be best crafting a constitution or focus + Refreshing rapier, but if you're still working on your Weaponsmithing trade skill, then the best drop to farm is the [item_1hrapier_lasthopet5] rapier by doing the Protector's Elite Boss arena in Reekwater.
Armor
For light armor builds, you're also going to need to head to the most recently added expedition, Tempest Heart. Tempest Heart has two armor pieces that are about as BiS as they come, complete with the ideal perks mentioned previously, and those are the [item_lighthead_sagacioushatt5] and the [item_lightlegs_sagaciouspantst5]. These are both excellent pieces, although they do lack the Resilient perk for PvP.
For medium builds, again you want to head into Tempest Heart, but you're going to be farming for the [item_heavyhead_conquerorshelmt5]. This a great head piece to start off your set, and is already kitted out with Resilient so is also viable for PvP.
Some other really impressive items also drop from the newly-added PvP Rewards Track. As you increase your PvP rank, you are looking for three BiS items in particular. These are the [item_mediumchest_pvp_namedt5] chest piece, the [item_lightfeet_pvp_namedt5], and the [item_lighthands_pvp_namedt5] gloves.
Alternatively, if PvP isn't so much your thing, then three very important pieces to farm are the [item_mediumchest_dynastyshipyard_mutt5] chest piece which drops from mutated Dynasty Shipyard, and the [item_lighthands_tempestuoushandcovers_foct5] gloves and [item_lighthead_tempestuouscowl_foct5] headpiece that can be found in the [item_questrewardisabella6] that is rewarded to you after you complete Isabella's side storyline. To start the quest line, find [npc_0726_mararosa] in Shattered Mountain at the foot of the Tempest's Heart expedition area to trigger the first objective, [quest_0726_0101_mightytempest], and follow the story until you are rewarded with the magician's chest.
Jewelry
In terms of jewelry, there are some pretty good earrings and amulets available as drops that are a great starting point for your builds. From Garden of Genesis, you can get the [item_earringt5_mistykismetcharm] earring, or alternatively you can head on a newly-added Mutated run of The Depths expedition to farm the [item_earringt5_heartstendriltrinket] earring instead. It's worth noting that neither of these alone are BiS, so it would be a good idea to eventually craft your own earring with a better combination of perks, but both of these earrings make good starting points - the Misty Kismet Charm for increased healing output, and the Heart's Tendril Trinket for an ideal starter for a medium void gauntlet build.
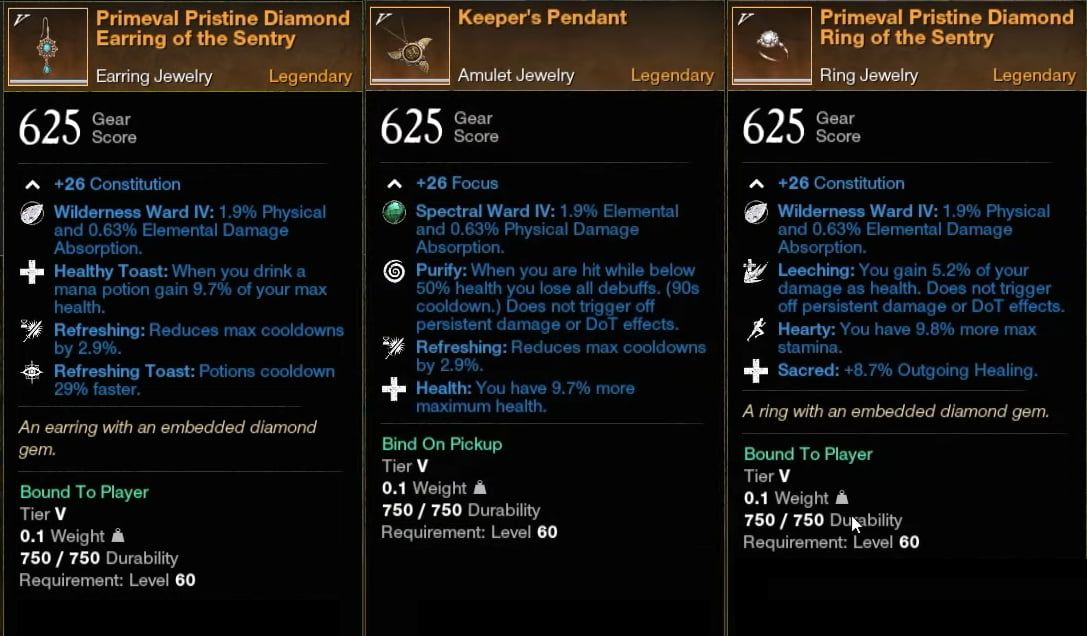
For amulets, you have a choice of farming the mutated version of Dynasty Shipyard for the [item_amulett5_keeperspendant] amulet, or working up through the PvP Rewards Track in search of the [item_amulet_pvp_namedt5]. The Champion's Amulet is about as BiS as they come, but since there is no set level on the track that you can recieve it, there is a lot of luck and RNG involved it acquiring it.
Unfortunately, there are no decent rings that drop anywhere in the game currently, so your two options for rings are crafting or splashing out on the trading post.
Other Essential Information
Gems
Another important point to touch on is gems. Gems are key to unlocking your weapons' and armor's extra potential.
For your life staff and void gauntlet, you want to be slotting in [item_diamondcutt4]s as they increase your outgoing healing. A good choice for the rapier is a [item_ambercutt4] as this increases your damage and scales off your focus stat. For your armor, a mixture of [item_diamondcutt4]s and [item_malachitecutt4] is ideal, with both of these gems reducing any incoming physical and elemental damage.
In-game Settings
Here are some key points to note in terms of the actual settings for healers. Your healing options can be found in the Gameplay tab of the settings menu.
In most situations, you want to have the Targeted Healing setting turned on. Within the targeted healing menu, however, make sure to turn Freeform Camera on. This will give you freedom to look around, instead of the camera always trying to snap towards to the ally you are trying to heal.
Another important setting to think about is Group Mode healing. When Group Mode is on, it only enables healing the members of your party, and when Group Mode is off, you are able to heal all allies within range. The handy thing with this setting is that it can be easily toggled on and off mid-combat once you set it to a keybind.
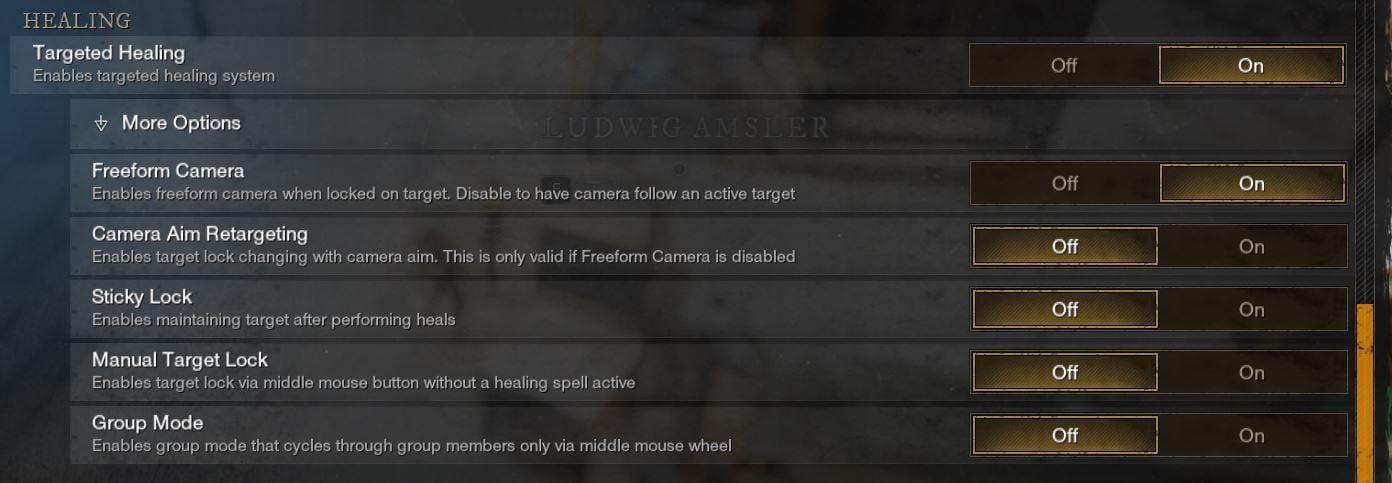
A small settings change to make is not to have a keybind assigned to Group Member 1 -this is you. This is a redundant keybind that takes up valuable keybind space, as you can easily target heal yourself by holding in control while casting a healing ability.
As previously mentioned, in most situations you want to have Targeted Healing on, but this does not apply to AoE healer builds. if you are running all AoE abilties, you will want to turn Targeting Healing off to give you free control over the placement of your abilities.
Another neat trick to bear in mind is to use the Exit Auto Target keybind. By temporarily exiting the auto target control after you have targeted an ally, you can then place your AoE healing ability in close proximity to the target area without attaching it to a specific ally. This is especially useful for quickly placing heals in a good spot when multiple players are clumped up.
Ending Note
This concludes my first written guide. Thank you for reading, and I hope you found this useful. If you did, make sure to leave a comment below so I know to keep turning my videos in to written guides!
A huge shout to this website, New World Database, for collaborating with me on this, and a big thank you to GamgeeTV for all her help with actually getting my videos down into written form.
I'm planning a series of these guides, including one for every major role, featuring information and advice from other well-known New World creators, so make sure to stay tuned!